After a great run, the Winning the Internet blog has been retired. However, you can still keep in touch with New Media Mentors here.

Yesterday I asked the question, “Is Google Grants worth the time?”. For most of us, the answer is yes.
Time and time again I come across small to mid-size nonprofit organizations that are interested in the Google Grants program, but don’t have a lot of time to spend learning to use the Adwords tool, or coming up with dozens of long tail keywords. For these organizations, I believe the secret to using Google Grants successfully is to limit the time spent on setup and maintenance.
With about an hour of work, most organizations can create a modest trickle of traffic to their website. While that might not sound like much, it’s important to keep in mind who these people are. Search is great because you’re able to capture traffic from people who are already interested in your issue. For example, if you work to stop the use of pesticides, someone that searches for “stop pesticides” could turn out to be one of your strongest supporters.
Below is a guide to getting your account up and running with about an hour of work. If you’ve already got an account going, stay tuned for tips on taking your Google Grants account to the next level.
Step 1: Apply
The first thing you need to do is apply for the Google for Nonprofits program, if your organization hasn’t done this already. Then, you need to take one more step, and apply for the Google Grants program specifically. Fair warning: It can take up to a couple of months for Google to get back to you about your application (though lately I’ve found that it’s taken only a few days).
Step 2: Create a new campaign
Log into AdWords and create a new campaign. You’re going to want to leave everything set to the default settings, except for the following fields.
Give the campaign a name in the “Campaign name” box.
 Under “Bidding and Budget”, select “I’ll manually set my bids for clicks”. Set the default bid to $1 (Google Grants limits you to a maximum bid of $1 per keyword), and the budget to $330 (that’s the daily limit set by the Google Grants program).
Click “Save and continue” at the bottom of the page.
Step 3: Create an ad group with your organization’s name
The tool will automatically prompt you to create an ad group. An ad group is essentially a bunch of keywords that share a similar theme, and thus will share an ad. For your first ad group, you may want to use keywords similar to your organization’s name and name the ad group “Organization name”. Go ahead and type the name of the ad group in the appropriate box.
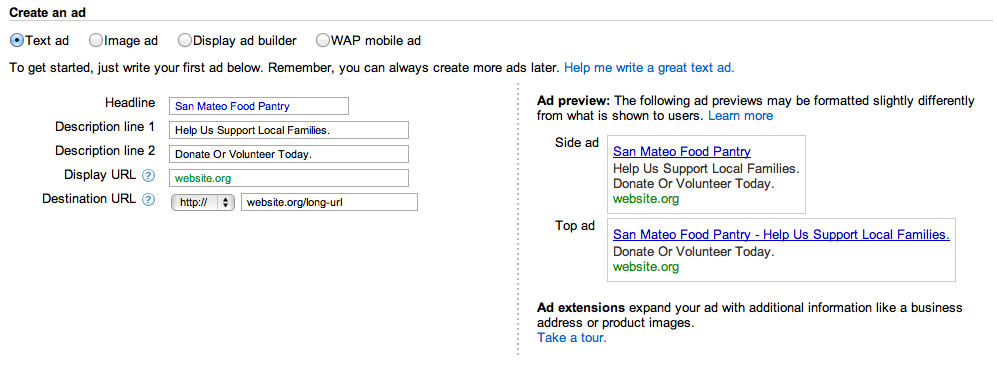
Below that, you’ll need to create an ad. The headline can be up to 25 characters long (including spaces) and should be similar to the term the searcher was actually searching for. (So, for your first ad group, you may want to use your organization’s name.)
You have two lines of descriptive text, up to 35 characters each. This is your chance to make your case and convince the searcher to click your ad. For your first ad group, you may just want to shorten text your organization already uses to describe the org. For other ad groups, you may want to make a brief appeal, then push for action.
For the destination url, copy and paste the url of a page on your website that matches up well with your ad and the theme of the ad group. For the display url, use a shorter, more attractive url – like website.org or website.org/act.
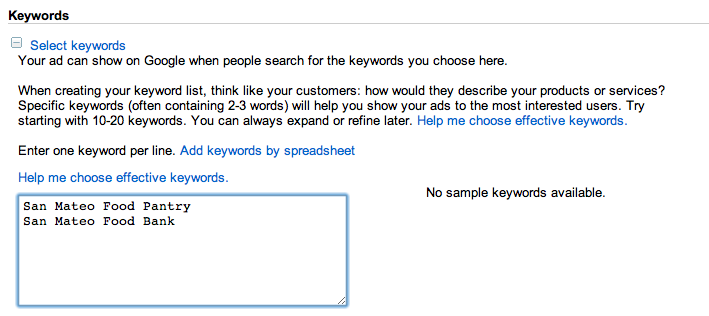
Finally, type in all of the words you can think of that relate to that ad group. Limit yourself to terms that relate directly to your organization and your website. If you think the searcher is probably looking for your organization or information related to your site, go ahead and include the term. If you think the searcher is only possibly looking for your organization or information related to your site, skip it. For example, an organization named the San Mateo Food Pantry might select terms like “San Mateo Food Pantry” and “San Mateo Food Bank”.
Leave everything else set to the default settings and click “Save ad group”. Limit yourself to 10-15 minutes per ad group. If AdWords prompts you to enter billing information, it means your Grants account was not successfully setup and you need to contact Google. Do not enter your credit card information.
Step 3: Create an ad group based on your organization’s mission
Repeat step two (click on “Ad groups”, then “+ New ad group”), but focus this ad group on your organization’s mission. Depending on how diverse your mission is, you may want to create more than one ad group. For many organizations, this means one ad group per programmatic area. Remember to adjust your ad so it relates to the search terms. Again, limit yourself to 10-15 minutes per ad group.
Step 4: Let your ads run and check your results
After about a week, log back in and click on the Home tab. You can adjust the date range by clicking on the date in the top right hand corner of the screen. The number of clicks are the number of clicks on your ads, and the number of impressions are the number of times your ad was shown. The cost is the amount of money that you “spent” over that time (that’s the amount you would have spent if you actually paid).
Check in on your account periodically. If you are happy with your results, you’re done. If you’d like to do more, stay tuned for tips on optimizing your account.


Comments are closed.